Better image optimisation in Drupal
When optimising a site for performance, one of the options with the best effort-to-reward ratio is image optimisation. Crunching those images in your Front End workflow is easy, but how about author-uploaded images through the CMS?
Recently, a client of ours was looking for ways to reduce the size of uploaded images on their site without burdening the authors. To solve this, we used the module Image Optimize which allows you to use a number of compression tools, both local and 3rd party.
The tools it currently supports include:
- Local
- 3rd Party
- Resmush.it (General)
- TinyPng (PNG & JPEG)
We decided to avoid the use of 3rd party services, as processing the images on our servers could reduce processing time (no waiting for a third party to reply) and ensure reliability.
Picking your server-side compression tool
In order to pick the tools which best served our we picked an image that closely represented the type of image the authors often used. We picked an image featuring a person’s face with a complex background - one png and one jpeg, and ran it through each of the tools with a moderately aggressive compression level.
PNG Results
| Compression Library | Compressed size | Percentage saving |
|---|---|---|
| Original (Drupal 8 default resizing) | 234kb | - |
| AdvPng | 234kb | 0% |
| OptiPng | 200kb | 14.52% |
| PngCrush | 200kb | 14.52% |
| PngOut | 194kb | 17.09% |
| PngQuant | 63kb | 73.07% |
| Compression Library | Compressed size | Percentage saving |
|---|---|---|
| Original | 1403kb | - |
| AdvPng | 1403kb | 0% |
| OptiPng | 1288kb | 8.19% |
| PngCrush | 1288kb | 8.19% |
| PngOut | 1313kb | 6.41% |
| PngQuant | 445kb | 68.28% |
JPEG Results
| Compression Library | Compressed size | Percentage saving |
|---|---|---|
| Original (Drupal 8 default resizing) | 57kb | - |
| JfifRemove | 57kb | 0% |
| JpegOptim | 49kb | 14.03% |
| JpegTran | 57kb | 0% |
| Compression Library | Compressed size | Percentage saving |
|---|---|---|
| Original | 778kb | - |
| JfifRemove | 778kb | 0% |
| JpegOptim | 83kb | 89.33% |
| JpegTran | 715kb | 8.09% |
Using a combination of PngQuant and JpegOptim, we could save anywhere between 14% and 89% in file size, with larger images bringing greater percentage savings.
Setting up automated image compression in Drupal 8
The Image Optimize module allows us to set up optimisation pipelines and attach them to our image styles. This allows us to set both site-wide and per-image style optimisation.
After installing the Image Optimize module, head to the Image Optimize pipelines configuration (Configuration > Media > Image Optimize pipeline) and add a new optimization pipeline.
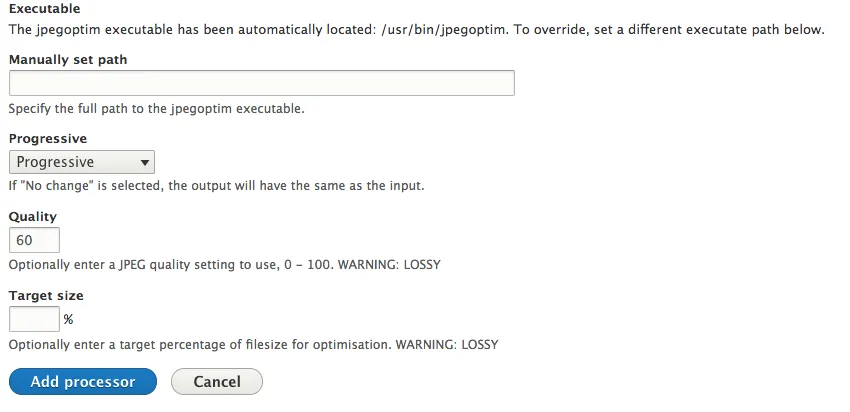
Now add the PngQuant and JpegOptim processors. If they have been installed to the server Image Optimize should pick up their location automatically, or you can manually set the location if using a standalone binary.
JpegOptim has some additional quality settings, I’m setting “Progressive” to always and “Quality” to a sweet spot of 60. 70 could also be used as a more conservative target.
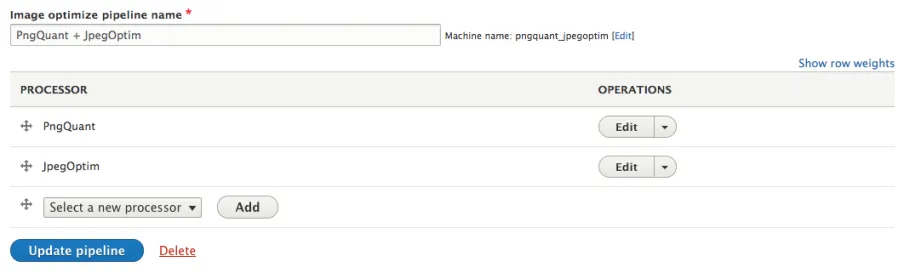
The final pipeline looks like the following:
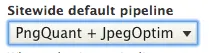
Back to the Image Optimize pipelines configuration page, we can now set the new pipeline as the sitewide default:
And boom! Automated sitewide image compression!
Overriding image compression for individual image styles
If the default compression pipeline is too aggressive (or conservative) for a particular image style, we can override it in the Image Styles configuration (Configuration > Media > Image styles). Edit the image style you’d like to override, and select your alternative pipeline:

Applying compression to existing images
Flushing the image cache will recreate existing images with compression the next time the image is loaded. This can be done with the drush command
drush image-flush --all
Conclusion
Setting up automated image optimisation is a relatively simple process, with potentially large impacts on site performance. If you have experience with image optimisation, I would love to hear about it in the comments.